Sunday, December 19, 2010

Introduction to InterceptingCatalog – Part II – Open Generics Support

In the previous post I have described how to setup interception using the InterceptingCatalog and InterceptionConfiguration class. Just to remind you, the interception allows you to take control over the exported instances thanks to the IExportedValueInterceptor interface. Although this is the primary functionality, there is other bunch of stuff possible to do with the catalog. In this post I am going to show how to enable open-generics support for MEF using both the InterceptingCatalog and the decorating GenericCatalog. I will then introduce the IExportHandler interface which gives the ability to do some nice filtering based on a given criteria as well as to add new exports on the fly. The open generics support implementation is based on the on the fly export creation (thanks to the IExportHandler interface) as well as thing called part rewriting. Keep reading to find out more!

The problem

One of the biggest problem people complain about is the lack of open-generics support in MEF. You can read about this issue here, here and here (I advise you see these entries!). The canonical example folks use concerns IRepository<T>. Imagine the following code:

public interface IRepository<T>
{
T Get(int id);

void Save(T instance);
}

[Export(typeof(IRepository<>))]
public class Repository<T> : IRepository<T>
{
public T Get(int id)
{
return (...);
}

public void Save(T instance)
{
Console.WriteLine("Saving {0} instance.", instance.GetType().Name);
}
}

/// <summary>
/// Fake customer.
/// </summary>
public class Customer { }

[Export]
public class CustomerViewModel
{
[Import]
public IRepository<Customer> Repository { get; set; }
}

So what happens here ? We simply export a generic implementation of the generic interface IRepository<T> with an open-generic contract type, and we import a closed-generic part based on the open generic contract. Unfortunately, this isn’t supported out of the box in MEF. However, thanks to MefContrib, it is!

How can I get it ?

Open generics support shipped initially in the MefContrib 1.0 release. However, it had limited capabilities as the open generics worked only when generic types were exported using the InheritedExport attribute. To get the updated version, which enables to do things like the above, you have to download MefContrib repo and compile the sources yourself. Updated samples, including those presented here, are available in the MefContrib-Samples repo. Go and get them =)

Container setup

There are two ways of enabling open generics support. You can either use more verbose syntax using the InterceptingCatalog, or you can leverage the GenericCatalog. The GenericCatalog is noting more than a convenient decorating catalog which internally uses the InterceptingCatalog.

The first thing to do is to provide mapping between open generic interface and its implementation. This step is mandatory since the underlying infrastructure requires to produce export based on the concrete implementation. This export is produced on the fly, which means it is not contained in any composable catalog, but is created when it is needed. To map the contract type to its implementation you can either implement IGenericContractRegistry interface or inherit the GenericContractRegistryBase class. The implementation which supports the above example is presented below.

[Export(typeof(IGenericContractRegistry))]
public class MyGenericContractRegistry : GenericContractRegistryBase
{
protected override void Initialize()
{
Register(typeof(IRepository<>), typeof(Repository<>));
}
}

Important: the mapping is required only when you export the generic class with explicitly given contract type (like in the example). If you export generic class with its default contract type, no mapping is required!

Next is what you have probably expected – the catalog setup.

// Create source catalog
var typeCatalog = new TypeCatalog(typeof(CustomerViewModel), typeof(MyGenericContractRegistry));

// Create the interception configuration and add support for open generics
var cfg = new InterceptionConfiguration()
.AddHandler(new GenericExportHandler());

// Create the InterceptingCatalog and pass the configuration
var interceptingCatalog = new InterceptingCatalog(typeCatalog, cfg);

// Create the container
var container = new CompositionContainer(interceptingCatalog);

// Get the repository
var repository = container.GetExportedValue<CustomerViewModel>().Repository;
After creating the interception configuration, we add the GenericExportHandler instance which is responsible for creating closed generic parts. This class implements the IExportHandler interface, which I will introduce in a moment. Meanwhile, let’s see the less verbose and cleaner setup routine.

// Create source catalog
var typeCatalog = new TypeCatalog(typeof(CustomerViewModel));

// Create catalog which supports open-generics, pass in the registry
var genericCatalog = new GenericCatalog(new MyGenericContractRegistry());

// Aggregate both catalogs
var aggregateCatalog = new AggregateCatalog(typeCatalog, genericCatalog);

// Create the container
var container = new CompositionContainer(aggregateCatalog);

// Get the repository
var repository = container.GetExportedValue<CustomerViewModel>().Repository;

Instead of creating the InterceptingCatalog, the GenericCatalog is created. This concludes how to setup MEF to support open generics. Next sections explain how stuff works, without digging into implementation details though. If you are curious, keep reading!

How does it work ?

You are maybe asking yourself – given the export definition below – how does MEF know that when importing say IRepository<Order>, it should inject Repository<Order> ?!
[Export(typeof(IRepository<>))]
public class Repository<T> : IRepository<T>
{
}

In fact MEF only knows there is an export Repository<T> which is NOT the required one! And this is not the only question! Attentive reader will also observe the the contract type (which is a string) of the given export will be ‘SomeCleverNamespace.IRepository()’ which is an open generic. But the import’s contract type will be ‘SomeCleverNamespace.IRepository(SomeOtherCleverNamespace.Order)’ which is a closed generic. So even though MEF somehow knew the export Repository<Order>, the contract types wouldn’t match resulting in ImportCardinalityMismatchException.

The answer to the first question is on the fly export creation. Earlier I have introduced the concept of mapping contract type to its implementation(s). So when we import IRepository<>, MEF knows its implementation is Repository<>. But of course we import closed generic, like I said IReposiotry<Order>, so MEF knows the implementing type is Repository<Order>. Of course there is no export Repository<Order>, only Repository<T>. So it have to be introduced in runtime! This is where IExportHandler comes to play. The open generics support is all implemented in the GenericExportHandler class which is responsible for creating closed generic exports on the fly.

Finally, the answer to the second question is part rewriting. When we create Repository<Order> export on the fly (I mean in runtime), the export’s contract type will remain ‘SomeCleverNamespace.IRepository()’. So we have to rewrite the part so that the contract type and optionally contract name will be set properly. To do the part rewriting, special catalog is used – GenericTypeCatalog. It accepts two types – the concrete type being exported (e.g. Repository<Order>) and the open-generic contract type (e.g. IRepository<>). What the catalog does in its internals is to rewrite all open-generic exports which match the contract type to be closed-generic. In our example, the contract type will be rewritten from ‘SomeCleverNamespace.IRepository()’ to ‘SomeCleverNamespace.IRepository(SomeOtherCleverNamespace.Order)’. Same for contract name.

Meet the IExportHandler interface

The purpose of this interface is to filter out exports based on any criteria you want, as well as to dynamically create new exports. Let’s have a look at the IExportHandler signature.

public interface IExportHandler
{
void Initialize(ComposablePartCatalog interceptedCatalog);

IEnumerable<Tuple<ComposablePartDefinition, ExportDefinition>>
GetExports(
ImportDefinition definition,
IEnumerable<Tuple<ComposablePartDefinition,ExportDefinition>> exports);
}

Wow! This looks complicated! Hopefully, it is not :) The initialize method gets called once when the export handler is initialized. Within this method you get a reference to the catalog being intercepted. The main player here is the GetExports method which has the exact same signature as the GetExports method in the ComposablePartCatalog class. It is called whenever an InterceptingCatalog is asked for exports which match the given import. The import definition is passed as the first argument. The second argument is a collection of matching export definitions along with theirs ComposablePartDefinition instances. The initial collection is the collection of exports from the intercepted catalog. Because the method returns the collection of matching exports, we can filter out the original exports we don’t want to show up, or what is more interesting, we can add our own export definitions!

Known limitations

Although support for open-generics in MefContrib is pretty amazing, it is not perfect. The first and probably the biggest limitation is the lack of support for recomposition. The other problem is that type being imported is inferred from the language construct rather than the import itself. Consider the following two imports.

[Import]
public IRepository<Order> OrderRepository { get; set; }

[Import(typeof(IRepository<Order>))]
public object OrderRepository { get; set; }

Both imports are perfectly legal. But only the former works as expected. This is because the type being imported is inferred from the property’s type, which is IRepository<Order>. In the latter example, the contract type is explicitly given in the Import attribute, but the property’s type is object, hence the inferred type will be object, which is not the case. You may want to know why is that. As you probably know, the import in MEF is represented by the ImportDefinition class. Unfortunately, it is NOT possible to get the Type instance representing the import from the ImportDefinition instance, only the defining construct (like property, field, etc.) and only for those ImportDefinition instances created by MEF’s Reflection Model.

Conclusion

In this post I have presented MefContrib’s approach to enable open-generic type composition. Hope you like it!

Tuesday, December 14, 2010

MEF Deep Dive Talk

Recently, I gave 2 talks about Managed Extensibility Framework. One on KGD.NET, which is our local .NET group (on Nov 24th 2010), and one on IT Academic Day at Uniwersytet Jagielloński in Kraków (Dec 14th 2010). Both of my talks went good! I do enjoy spreading knowledge about MEF and MefContrib! When it comes to the presentations, both were mostly the same, although on ITAD I was speaking more about MEF itself and less about hard stuff, so it was kind a MEF Deep Dive Light Edition =) I covered the following:

  1. Basics of developing loosely coupled components
  2. MEF basics (parts, exports, imports, composition)
  3. Catalogs
  4. Metadata
  5. Custom export attributes
  6. Recomposition
  7. Stable composition
  8. Debugging MEF
  9. MefContrib
  10. MEF Extensibility

You can find all the materials (slides + source code) from the KGD.NET meeting here and from the ITAD here. If you haven’t attended any of the talks, you might still want to go through the slides (these are nice!) and run the demos (VS 2010). Finally, I want thank Mike Taulty for letting me use some of the slides from his MEF talk =)

Saturday, December 4, 2010

MatrixAnimation for WPF

Windows Presentation Foundation has a powerful animation system. It comes with various classes which enable dependency properties’ values to be animated, i.e. to be automatically changed during a given period of time. WPF supports four types of animations:

  • Linear animation – a value of a property linearly changes from a starting value (referred as From) to a destination value (referred as To).
  • Key frame animation – animation is specified using key frames, each key frame specifies the time and the desired value. The animated property will be assigned once the timeline hits the give time.
  • Path-based animation – property value is given by a geometric path.
  • Frame-based animation – this is the most powerful animation approach, the CompositionTarget class is used to create custom animations based on a per-frame callback.

The first three animation types are supported by <Type>Animation, <Type>AnimationUsingKeyFrames and <Type>AnimationUsingPath classes, respectively. For example, consider the double type. Its animation is supported by DoubleAnimation, DoubleAnimationUsingKeyFrames and DoubleAnimationUsingPath classes.

WPF also supports matrix animations. However, out of the box, only key frame and path-based animations are supported for the Matrix type. This post introduces MatrixAnimation class, which performs linear, smooth animation of the Matrix type. The animation supports translation, scaling and rotation along with easing functions. The following 14 sec-length video shows an early preview of a multi-touch MDI interface whose windows are being animated using the MatrixAnimation class.

The following code snippet represents the MatrixAnimation class.
public class MatrixAnimation : MatrixAnimationBase
{
public Matrix? From
{
set { SetValue(FromProperty, value); }
get { return (Matrix)GetValue(FromProperty); }
}

public static DependencyProperty FromProperty =
DependencyProperty.Register("From", typeof(Matrix?), typeof(MatrixAnimation),
new PropertyMetadata(null));

public Matrix? To
{
set { SetValue(ToProperty, value); }
get { return (Matrix)GetValue(ToProperty); }
}

public static DependencyProperty ToProperty =
DependencyProperty.Register("To", typeof(Matrix?), typeof(MatrixAnimation),
new PropertyMetadata(null));

public IEasingFunction EasingFunction
{
get { return (IEasingFunction)GetValue(EasingFunctionProperty); }
set { SetValue(EasingFunctionProperty, value); }
}

public static readonly DependencyProperty EasingFunctionProperty =
DependencyProperty.Register("EasingFunction", typeof(IEasingFunction), typeof(MatrixAnimation),
new UIPropertyMetadata(null));

public MatrixAnimation()
{
}

public MatrixAnimation(Matrix toValue, Duration duration)
{
To = toValue;
Duration = duration;
}

public MatrixAnimation(Matrix toValue, Duration duration, FillBehavior fillBehavior)
{
To = toValue;
Duration = duration;
FillBehavior = fillBehavior;
}

public MatrixAnimation(Matrix fromValue, Matrix toValue, Duration duration)
{
From = fromValue;
To = toValue;
Duration = duration;
}

public MatrixAnimation(Matrix fromValue, Matrix toValue, Duration duration, FillBehavior fillBehavior)
{
From = fromValue;
To = toValue;
Duration = duration;
FillBehavior = fillBehavior;
}

protected override Freezable CreateInstanceCore()
{
return new MatrixAnimation();
}

protected override Matrix GetCurrentValueCore(Matrix defaultOriginValue, Matrix defaultDestinationValue, AnimationClock animationClock)
{
if (animationClock.CurrentProgress == null)
{
return Matrix.Identity;
}

var normalizedTime = animationClock.CurrentProgress.Value;
if (EasingFunction != null)
{
normalizedTime = EasingFunction.Ease(normalizedTime);
}

var from = From ?? defaultOriginValue;
var to = To ?? defaultDestinationValue;

var newMatrix = new Matrix(
((to.M11 - from.M11) * normalizedTime) + from.M11,
((to.M12 - from.M12) * normalizedTime) + from.M12,
((to.M21 - from.M21) * normalizedTime) + from.M21,
((to.M22 - from.M22) * normalizedTime) + from.M22,
((to.OffsetX - from.OffsetX) * normalizedTime) + from.OffsetX,
((to.OffsetY - from.OffsetY) * normalizedTime) + from.OffsetY);

return newMatrix;
}
}

The code is actually quite simple. The class is derived from the abstract MatrixAnimationBase class. Firstly, three dependency properties are defined, namely From, To and EasingFunction. Next comes a bunch of useful constructors. The interesting part resides in the GetCurrentValueCore method. At first, the current animation time is retrieved. Also, the animation time is eased with the easing function if it is available. Lastly, new matrix is calculated based on the From and To values. Each matrix cell is linearly scaled with the time value. And that’s it! This provides smooth animation for the matrix type!


Tuesday, November 9, 2010

Introduction to InterceptingCatalog – Part I

Managed Extensibility Framework uses the concept of catalogs. A single catalog is responsible for providing access to parts, which are mostly components in the system (ordinary .NET classes). I said mostly because MEF is not limited to operating on types, it also supports method, property and field composition. The catalog is then used by the CompositionContainer to pull parts from it. Out of the box MEF ships with 4 core catalogs, which are meant to discover attributed parts (an attributed part is simply a component which uses attributed programming model for discovery purposes). These catalogs are TypeCatalog, DirectoryCatalog, AssemblyCatalog, and AggregateCatalog. Catalogs serve one other crucial purpose – they are responsible for instantiating parts. The thing is that the underlying infrastructure (aka Reflection Model) responsible for that process is hidden from the developer and it is not possible to attach anything to the creation pipeline. People who just begin their MEF adventure might feel a little disappointed at first, because all of the IoC containers available today provide neat infrastructure for integrating custom build strategies into the creation pipeline. Furthermore, some of them, support interception out of the box (like the Unity container from MS Patterns & Practices).

The InterceptingCatalog, initially written by Glenn Block, has been introduced to fix this gap. It provides a convenient mechanism which allows to intercept values exported via MEF, it allows to chain interceptors together to form custom instance processing pipeline (Chain of Responsibility design pattern). The catalog also enables to create exports on the fly (which is used to provide open-generics support for MEF) and to filter existing exports based on some criteria. The catalog itself has been built around the Decorator pattern – it decorates any ComposablePartCatalog. You can find it in the MefContrib project available at mefcontrib.com.

In this series of posts I am going to discuss all the benefits of using the InterceptingCatalog. In the first part I will focus on intercepting capabilities of the catalog, and in subsequent posts I will cover filtering scenario and show how to enable the open-generics support.

Interception

Let’s begin with a simple example and then build on top of it. Assume we have IStartable interface defined as follows:
public interface IStartable
{
bool IsStarted { get; }

void Start();
}

We want every component, which implements the IStartable interface, have its Start method automatically called by the IoC container as part of the creation process. First, lets investigate the solution on the Unity IoC example. Note that the interception term does not apply to the Unity solution as the Unity fully supports custom build strategies =)

public class MyExtension : UnityContainerExtension
{
protected override void Initialize()
{
Context.Strategies.AddNew<StartableStrategy>(UnityBuildStage.Initialization);
}

public class StartableStrategy : BuilderStrategy
{
public override void PreBuildUp(IBuilderContext context)
{
var instance = context.Existing as IStartable;
if (instance != null)
{
instance.Start();
}
}
}
}

The code is dead simple. We define our own extension named MyExtension, which does nothing more than registering the StartableStrategy during the instance initialization phase. The inner StartableStrategy does all the job - if the instance being created implements IStartable, it calls its Start method. The usage is also pretty straightforward. All we have to do is to add MyExtension to the container!

IUnityContainer container = new UnityContainer();
container.AddNewExtension<MyExtension>();

var foo = container.Resolve<StartableFoo>();
Console.WriteLine(foo.IsStarted); // Prints True

Assuming that the StartableFoo part implements the IStartable interface, it will have its Start method called during the Resolve method call. Now let's look at how this scenario could be implemented in MEF. As I stated previously, MEF doesn't allow the developer to register custom build strategies within the build process. Hence, we need to use interception. This is where the InterceptingCatalog comes to play. To use the InterceptingCatalog, we first need to create proper configuration. The configuration is provided by means of InterceptionConfiguration class:

public class InterceptionConfiguration : IInterceptionConfiguration
{
public InterceptionConfiguration AddInterceptor(IExportedValueInterceptor interceptor);
public InterceptionConfiguration AddHandler(IExportHandler handler);
public InterceptionConfiguration AddInterceptionCriteria(IPartInterceptionCriteria partInterceptionCriteria);
}

In this example we are interested in the AddInterceptor and AddInterceptionCriteria methods which add interceptors to the catalog. The two methods correspond to two interception levels supported by the catalog. The first is the catalog wide interception level. Interceptors registered on this level are applied to all parts available in the decorated catalog. The second level is the per part interception level. Interceptors registered on that level apply only to selected parts, and the developer specifies to which parts the interceptor should be applied by specifying a predicate which accepts ComposablePartDefinition and returns bool. Next example will show this in action. Meanwhile, this is how our StartableStrategy might look like:

public class StartableStrategy : IExportedValueInterceptor
{
public object Intercept(object value)
{
var startable = value as IStartable;
if (startable != null)
{
startable.Start();
}

return value;
}
}

As you can see, all interceptors have to implement the IExportedValueInterceptor interface, which defines single Intercept method. The method gets called as soon as the exported value is requested, and the value itself is passed as the parameter. To demonstrate the usage, we will use two parts, namely IFoo and IBar. The IBar part is defined as follows:

public interface IBar
{
void Foo();
}

[Export(typeof(IBar))]
public class Bar : IBar, IStartable
{
public Bar()
{
Console.WriteLine("Bar()");
}

public bool IsStarted { get; private set; }

public void Start()
{
IsStarted = true;
Console.WriteLine("Bar.Start()");
}

public void Foo()
{
Console.WriteLine("Bar.Foo()");
}
}

The code which uses the StartableStrategy is also very simple.

// Create the catalog which will be intercepted
var catalog = new TypeCatalog(typeof(Bar), typeof(Foo));

// Create interception configuration
var cfg = new InterceptionConfiguration()

// Add catalog wide startable interceptor
.AddInterceptor(new StartableStrategy());

// Create the InterceptingCatalog with above configuration
var interceptingCatalog = new InterceptingCatalog(catalog, cfg);

// Create the container
var container = new CompositionContainer(interceptingCatalog);

var barPart = container.GetExportedValue<IBar>();

Because the IBar part implements the IStartable interface, it will have its Start method called as part of GetExportedValue call. This example concludes the basics of using InterceptingCatalog. Lets move on to the next interception example which uses Castle.DynamicProxy to create proxies for objects. We will add logging capabilities to the IFoo part. We do not want to log method execution on the IBar part, so we are going to leverage the per part interception. The IFoo part looks identical to the IBar part, except it is decorated with ExportMetadata attribute, which tells the system that we want to log method execution on that part.

public interface IFoo
{
void Bar();
}

[Export(typeof(IFoo))]
[ExportMetadata("Log", true)]
public class Foo : IFoo, IStartable
{
public Foo()
{
Console.WriteLine("Foo()");
}

public bool IsStarted { get; private set; }

public void Bar()
{
Console.WriteLine("Foo.Bar()");
}

public void Start()
{
IsStarted = true;
Console.WriteLine("Foo.Start()");
}
}

Next comes the logging interceptor which implements Castle's IInterceptor interface.

public class LoggingInterceptor : IInterceptor
{
public void Intercept(IInvocation invocation)
{
Console.WriteLine("--- LOG: About to invoke [{0}] on [{1}] ---",
invocation.Method.Name,
invocation.InvocationTarget.GetType().Name);

// Invoke the intercepted method
invocation.Proceed();

Console.WriteLine("--- LOG: Invoked [{0}] ---", invocation.Method.Name);
}
}

The interceptor simply prints information to the console before and after a method execution. The code which puts this sample together is almost a copy of the previous bootstrapping code:

var catalog = new TypeCatalog(typeof(Bar), typeof(Foo));

// Create interception configuration
var cfg = new InterceptionConfiguration()

// Add Castle DynamicProxy based logging interceptor for parts
// which we want to be logged
.AddInterceptionCriteria(
new PredicateInterceptionCriteria(
new DynamicProxyInterceptor(new LoggingInterceptor()), def =>
def.ExportDefinitions.First().Metadata.ContainsKey("Log") &&
def.ExportDefinitions.First().Metadata["Log"].Equals(true)));

// Create the InterceptingCatalog with above configuration
var interceptingCatalog = new InterceptingCatalog(catalog, cfg);

// Create the container
var container = new CompositionContainer(interceptingCatalog);

var barPart = container.GetExportedValue<IBar>();
barPart.Foo();

var fooPart = container.GetExportedValue<IFoo>();
fooPart.Bar();

Because we wanted to apply the logging interceptor on a per part basis, we use the AddInterceptionCriteria method, and pass the PredicateInterceptionCriteria instance. The PredicateInterceptionCriteria object takes any instance implementing the IExportedValueInterceptor interface along with a predicate which is used to determine which parts should be intercepted with the given interceptor. In the above example we intercept all parts declaring Export metadata named Log which equals to True. Note that our logging interceptor is based on Castle.DynamicProxy. To use it with the catalog, we need to wrap it with DynamicProxyInterceptor which implements IExportedValueInterceptor and can take any number of IInterceptor implementations. The sample produces the following output:

Interception


You can see that indeed the logging interceptor has only been applied to the IFoo part. Please note also that the IFoo has actually been intercepted by a chain of two interceptors, the StartableStartegy and the LoggingInterceptor (although the above sample code omits the first one for clarity). This forms a processing pipeline similar to pipelines found in regular IoC containers. This is all about interception in MEF. You can download sample code from my code gallery here. In the next post I will look at filtering capabilities. Stay tuned!

Saturday, October 16, 2010

MEF + Object Factories using Export Provider

MEF is a great composition platform. It is great because the power and flexibility it delivers, and at the same time, the learning curve is low. When it comes to part registration, MEF out of the box supports so called attributed programming model, which allows the discoverability simply by applying Export attributes on the parts we want to make available to the world, and Import attributes on the parts which need to consume other parts. However, using this default programming model, the developer has no way of introducing any build strategies which get executed during part’s creation when a concrete part is requested. This concept, know as Chain of Responsibility design pattern, is implemented by many (if not all) dependency injection containers. Most of them allow the developer to add new actions which are executed as part of object creation. Sadly enough, there’s no such facility in MEF. This implies yet another limitation – lack of support for custom object factories. This means it is always MEF who creates parts’ instances.

Luckily, MEF is extensible. It allows to develop completely new programming models by implementing custom catalogs (like the ConventionCatalog which is a part of MefContrib). It also enables the developers to implement custom export providers, whose role it to provide exports from various sources =) In this post I am going to introduce the FactoryExportProvider which extends MEF by allowing to define object factories.

Introducing Custom Factories

When you want co take control over instance creation in MEF, you basically have two options. Either create part manually and then call ComposeExportedValue method on that part as presented on the following listing

var component = new ExternalComponent2();
container.ComposeExportedValue(component);

or use property export as presented below.

[Export]
public IExternalComponent Component1
{
get
{
return new ExternalComponent3(/* Constructor Initialization */);
}
}

The first solution, however, is not very elegant. It also registers new part as singleton. The second one is better, but still the part will be created only once, and reused across many requests. Also note that in both solutions, a problem arises when it comes to injecting target part’s constructor – we don’t have access to the container so we can’t pull required parts from it. Of course we could get a reference to the container, but doing so only for this purpose will make the code more sloppy.

Meet FactoryExportProvider

The FactoryExportProvider is an elegant solution to the outlined problems. Consider the following sample code:

var provider = new FactoryExportProvider()
.RegisterInstance<IExternalComponent>(ep => new ExternalComponent2())
.Register<IExternalComponent>("part4", ep => new ExternalComponent4(
ep.GetExportedValue<IExternalComponent>(),
ep.GetExportedValue<IMefComponent>()));

var container = new CompositionContainer(anyCatalog, provider);
provider.SourceProvider = container;

You can clearly see two parts being registered, both with the same interface. The first one is registered as a singleton (shared in MEF), but more interestingly, the second is registered as transient (non shared in MEF) and will be created each time the part is requested. As part of the registration process, a factory method should be passed (this is not required, read on to find out why) which is responsible for delivering instances. Note also an elegant, though widely adapted, solution to resolving complex constructors. In the example, the ExternalComponent4 has a dependency on IExternalComponent and IMefComponent parts. However, thanks to the fact that the resolution method has access to the source provider (ExportProvider instance), we can use it to satisfy additional imports. Just remember to set SourceProvider property of the FactoryExportProvider to something meaningful (at least to the FactoryExportProvider instance itself as the SourceProvider is null by default). More common is to set it to the CompositionContainer instance.

FactoryExportProvider is quite flexible. It allows to register a fallback factory method which gets executed whenever part is registered without supplying the factory method enabling to design single resolution method for a subset or all parts registered in the factory. See the following example.

private static object FactoryMethod1(Type type, string registrationName)
{
if (type == typeof(IExternalComponent) && registrationName == null)
return new ExternalComponent1();

if (type == typeof(IExternalComponent) && registrationName == "external2")
return new ExternalComponent2();

return null;
}

var provider = new FactoryExportProvider(FactoryMethod1);
var container = new CompositionContainer(someCatalog, provider);

// Registration
provider.Register(typeof(IExternalComponent));
provider.Register(typeof(IExternalComponent), "external2");

The code presented in this post is available as part of MefContrib Project. Latest version is available on my fork. In the coming days I will push it to the main repo though! This export provider is also used by IoC plumbing infrastructure, which is also part of MefContrib Project, which enables integration of IoC and MEF. I blogged about particular implementations for Unity container here and here.

Hope you like it!

Saturday, September 4, 2010

Git on Windows with Console and PowerShell

Windows people like to do everything on their computers using GUI tools and WYSIWYG editors. And nothing is wrong with that. Personally, I like this approach – it conserves time while giving fast access to the most used options of a given tool (at least usually). Consider the SVN version control system. Initially, it was a console-based tool, but thanks to the great TortoiseSVN project, people may now forget about the command line. However, working with Git is different. Git was designed to be used from the command line, and using it in that way is a pure pleasure! Git commands are well crafted and easy to remember. If you are holding out on Git because it doesn’t give you the right GUI tools, you are holding out for a wrong reason.

Git comes with a bash like prompt which is very powerful. However, there is one problem. The bash prompt is launched within the standard Windows command line, and as probably anyone knows, the command prompt on Windows is one, big misery. So in this post I’m going to address this issue by showing how to set up a convenient command line environment for Git on Windows.

Installing Git

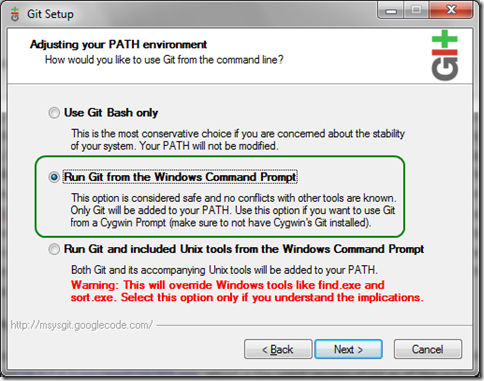
Git can easily be installed on Windows. Head over to http://code.google.com/p/msysgit/ and download Git-1.7.0.2-preview20100309.exe which is the latest version of Git as of this writing. When the installer asks about [Adjusting the PATH environment], select [Run Git from the Windows Command Prompt] as shown on the following screen.

clip_image001

Selecting this option allows to use Git from different shells, like PowerShell. Now that Git is installed, we can open a command line and verify it’s there.

clip_image003

We can also right click any folder in the Windows Explorer and select Git Bash Here – this will launch Git’s default bash shell.

clip_image005

Installing Console

Now it’s time to get rid of the ugly prompts shown above. Head over to the http://sourceforge.net/projects/console/ and download the latest version of the Console project. Launch it, and go to Edit->Settings, select Console from the tree on the left and pick up a new shell – the PoweShell. Under Windows 7/2008, it is located at %Windows_Dir%\System32\WindowsPowerShell\v1.0\powershell.exe. On previous versions of Windows, I believe it must be downloaded separately. Click OK and close the Console. Now launch it again, but this time with Administrator privileges, and issue the following command: [Set-ExecutionPolicy Unrestricted]. This command will allow running custom PowerShell scripts, which is needed for Git integration. Now you have a working PowerShell within nice, tabbed environment. We’re almost there!

Installing PoshGit

It’s time to enable PowerShell-Git integration. To do that, download Posh-Git latest sources available at http://github.com/dahlbyk/posh-git and unpack them to %Sys_Drive%:\Users\%Login%\Documents\WindowsPowerShell. Change profile.example.ps1 to profile.ps1. Hurray! You have enabled Git integration! What does it give? When you are inside Git repository, the command prompt changes to show on which branch you are, and whether there are any modifications, and if there are any untracked files (via exclamation mark). To enable output coloring, issue the [git config –global color.ui auto] command.

clip_image007

Enjoy your cool, command line interface for Git!

Thursday, September 2, 2010

Sharp3D – The Beginning

Back when I was on holidays, I’ve read a post by Maciej Aniserowicz about the “Daj się poznać” contest. The aim of the contest is to write an open source project of any kind in any technology, and blog about it at least twice a week, for ten weeks period. There’s also pretty nice collection of software to win. And because a crazy idea is floating in my head for a while, I thought – why don’t give it a try?

So what am I going to create? I’m going to build a research application for manipulating 3D objects, perhaps with the ability to define materials for them, modify existing objects, add new objects to the scene, and render them using custom crafted raytracing algorithm. As if this were not enough, application will fully support multi-touch displays.

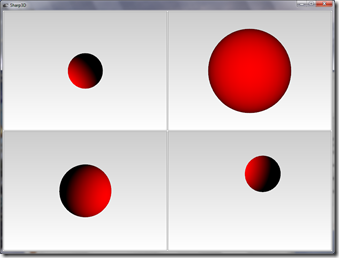
Currently, I have a basic skeleton of the application, with my own scene objects (I want to abstract from WPF elements). Here’s the screenshot from the initial drop.

Sharp3D

Motivation

There are a couple of reasons I’m writing this project. By no means, the most important thing for me is to learn strong basics of 3D programming. Triangles, tessellation, normals, materials, lightning, raytracing and more – there is a whole bunch of 3D stuff to master. I also want to learn this in context of WPF 3D – hope this will help me in building better looking apps in the future. I also want to see if the WPF 3D is suitable for project which does more than displaying 3D cubes with buttons on the sides. And last but not least – 3D programming is fun!

Goals

I want Sharp3D to be an extensible foundation for writing 3D applications by others. Thus, the main goal is the extensibility and component design. The application will span several components which can be used in standalone manner – this will support others in developing their own 3D applications! I want to provide many ways of interacting with the 3D model. So besides the standard mouse and keyboard, I will utilize multi-touch capabilities of today’s monitors, and the Wiimote. Because editing capabilities, if any, will be very limited, an important part is to write a loader which will take existing scene and import it to the program. I plan to implement 3ds file importer, because this is de facto the standard in the 3D industry – all known modeling applications support it. Having that, another cool feature will be XAML exporter.

Tools

Because this is a research project, I’m going to use the latest and greatest tools available J This includes:

· .NET Framework 4.0

· Visual Studio 2010

· WPF 4.0

· Blend 4.0

· Git

· Multi-touch / Wiimote

Sources

I decided to use Git which is a fast, distributed version control system. The distributed means that the code repository lives not only on the server (which by the way is not a requirement) but on the user’s computer. This allows committing changes locally, and then pushing them back to the server. When using Git, the natural choice for open source repository is GitHub. The Sharp3D sources can be found at http://github.com/pwlodek/Sharp3D.

There are two important branches. The most important is the master branch. It will contain, latest, stable version. The development will be done on the dev branch. Besides, I will try to use the branch-per-feature approach, which I presume is self-explanatory. After I decide a feature is complete, it will be merged into dev branch, and then into master.

Contribution

If you are interested in contributing to the project – you are more than welcome! Just drop me an email so we can discuss the details. To begin your contribution, register on GitHub and fork the main repo and work on your part. Once ready, issue a pull request – and I will do the rest ;) The one thing is that I won’t pull till the end of the contest as the participants are supposed to work on their own.

Thursday, May 13, 2010

Lazy<T> and IEnumerable<Lazy<T>> support comes to Unity

If you are familiar with .NET Framework 4.0 or Managed Extensibility Framework, you probably know that there's a type called Lazy<T> which enables lazy instantiation. This type comes in handy when used with any form of dependency injection. Instead of injecting a concrete instance of a service or whatever you want, you can inject instance which wraps the requested type and instantiates it only when the program really needs to use it. Consider the following code which uses - guess what - MEF =)
[Export]
public class Account
{
[Import]
public Lazy<ILogger> Logger { get; set; }

public void Deposit(decimal amount)
{
if (amount < 0)
{
Logger.Value.Log("Amount is less than 0.");
}
}
}
Here you can see a fragment of an Account class implementation which has an ILogger instance injected in lazy manner. As long as the Deposit method is not invoked with a value less than 0, the logger instance is not used, thus, it is actually not created at all! Lazy instantiation is particularly usefull when you are dealing with objects which are expensive to create.

There are some IoC containers which support Lazy<T> out of the box, namely Autofac 2, or Managed Extensibility Framework to name a few (I don't like calling MEF an IoC container, it's rather a composition engine since it is not constrained to inject types, but methods, fields and properties as well - sorry for that). Unfortunately, Unity IoC (even the latest Unity 2.0) is not on that list. Yes, I know. Unity 2.0 has a support for a concept known as automatic factories (you can read more on that here). Basically speaking, automatic factories allow to pull Func<T> - which is a delegate to a function which returns the concrete instance of the requested component when called. The idea is to fire this delegate when the instance is really needed. So you can say this serves the same purpose as Lazy<T>. Yeah, but it is not Lazy<T> ;) Besides, having the ability to pull Lazy<T> enables even better usage of the Unity+MEF integration layer, which is a part of MEF Contrib initiative. You can always find lates sources hosted on github.

OK. How to leverage the Lazy<T> and IEnumerable<Lazy<T>> ? This is a piece of cake. There are three ways of using the extension. If you want to pull a single component, here's how to do that:
unityContainer.RegisterType<IComponent, Component1>();
var lazyComponent = unityContainer.Resolve<Lazy<IComponent>>();
If you want to pull all components registered under a common type, you can do the following:
unityContainer.RegisterType<IComponent, Component1>("component1");
unityContainer.RegisterType<IComponent, Component2>("component2");
unityContainer.RegisterType<IComponent, Component3>();

// A collection of non-lazy components
var collectionOComponents = unityContainer.Resolve<IEnumerable<IComponent>>();

// Lazy collection of components, once resolved, all the components get resolved
var lazyCollectionOfComponents = unityContainer.Resolve<Lazy<IEnumerable<IComponent>>>();

// Concrete collection of lazy loaded components
var collectionOfLazyComponents = unityContainer.Resolve<IEnumerable<Lazy<IComponent>>>();;
One thing to note. Resolving an IEnumerable is not the same as calling ResolveAll! ResolveAll returns only named types, whereas IEnumerable returns everything!
Either way, before you can use anything presented so far, you have to add the extension the the container. It is as simple as calling:
unityContainer.AddNewExtension<LazySupportExtension>();

An important, and nice thing as well, is that the presented stuff is already the part of MEF Contrib. If you use MEF+Unity integration layer, you automatically get this behavior out of the box!
The code sample can be downloaded, as always, from my code gallery here. Enjoy!


kick it on DotNetKicks.com